BOHO ARMOIRE- HOW TO WHITEWASH WITH CHALK-BASED PAINT
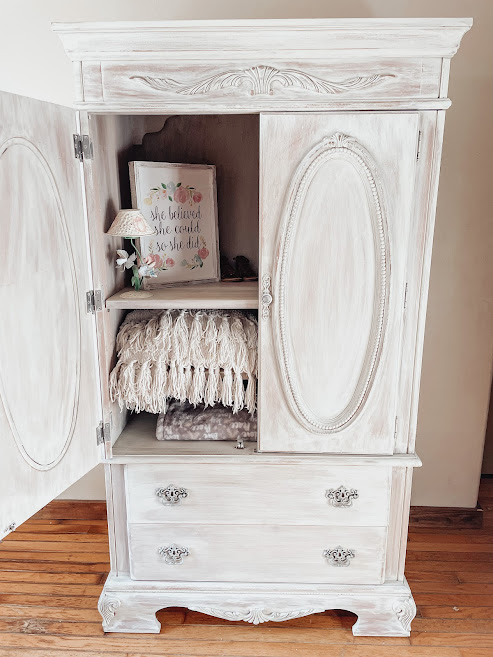
A few months ago, I stumbled upon this beautiful armoire for sale. I wasn’t really looking for an armoire at the time, but when I saw this particular one, I had to have it. The natural wood finish and gorgeous detailing of this piece would look amazing with a simple whitewash. Using a neutral, earthy paint color for the whitewash, I planned to create a bohemian (boho) style piece and this armoire would be perfect for it.

Straying From Traditional Whitewashing
This armoire possessed so much beauty just as it was. That’s one reason why I loved the idea of doing a whitewash. It would lighten up the warm wood tones, but still allow the wood grain to show through, which, in my opinion, would make it really stand out.
I decided not to use white paint for this project, which is typically used when whitewashing furniture. Since I wanted that boho feel, I decided to use a more neutral color in between a grey and beige. You can use just about any color of paint that you would like. Just keep in mind that bright colors will give you a more sheer effect and whites and neutral colors will provide a little more opacity. It only took a few hours one evening and this armoire was transformed into a gorgeous boho piece that I absolutely LOVE! Check out my Whitewashed Armoire-Video Tutorial, for a short tutorial on whitewashing.
* As an Amazon Associate, I earn from qualifying purchases and through other companies as well. You are not charged extra to use any of the links, but any income I make helps me create more amazing DIY projects and to keep this blog fresh! To see my full disclaimer, click here.
Supplies:
- chalk-based paint (Sunday Tea by Country Chic Paint)
- paint brush
- drop cloth
- 80, 220 grit sandpaper
- gloves
- lint-free rags
Step One: Clean the Furniture
It’s always a good idea to clean your furniture before you begin painting or whitewashing. Any grease, grime, or dirt left on the furniture can ruin your project. This armoire wasn’t too dirty, it just needed a good cleaning to remove the dust. So, for this project, I used a simple dishwashing liquid and water solution to clean it. I make sure to ring my rag out well so that it’s just a little damp. You don’t want your furniture piece to get really wet, as it could cause the wood to warp.

Step Two: Remove Existing Finish
Sand down the surface of your furniture piece to remove any existing paint, stain, or varnish. This is an important step because it opens the pores of the wood allowing the paint to get down into the grain of the wood.
When I sand by hand, I will usually take a sheet of sandpaper and wrap it around a sanding block. You certainly don’t have to wrap it, but it will save your hands from getting roughed up from the sandpaper. It also helps to apply even pressure while sanding. If your furniture piece requires quite a bit of sanding to get to the raw wood, I would suggest using an electric sander with 80-grit sandpaper to start and go back over it with 220 after that. Only the 220-grit sandpaper was needed to remove the finish from this armoire. When I finished sanding, I wiped the entire surface down with a slightly damp cloth to remove any dust and let it dry completely.
Step Three: Dilute the Paint
Dilute the paint with water, mixing together equal parts of each. Most chalk-based paints are also water-based, so you can add water to thin it down. You want to dilute it enough that it will easily soak into the grain of the wood, but not so thin that it wipes completely off. This is what gives your furniture piece a whitewashed look. Because the paint is pretty thin, it can be a little messy. So, I would suggest that you place a drop cloth or something similar under your furniture piece to protect your flooring before you begin.
Step Four: Test It
Before I begin painting the furniture, I like to make sure the paint is the right consistency. To do this, I will either take a spare piece of wood from another project and paint it or I will paint a small area on the furniture itself. If I am testing on the furniture piece itself, I will try to test inside a drawer or the underneath side of a shelf. If you don’t want paint all over your hands, you will definitely want to wear gloves.
Paint a small section for testing, let it sit round a min or a little less, and then wipe off the excess paint with a lint free rag. If there is too much coverage for your liking and not enough wood showing through, then you will want to add more water to the paint. When I need to add more water, I will usually add half of the original amount of water I used the first time and try again. Different brands of chalk-based paint will vary in thickness, so use your best judgment.
Step Five: Applying the Whitewash
There are a few different methods that you can use to whitewash wood, but I feel this method is easiest for beginners and gives nice results. Using a paintbrush, I painted the whitewash over the armoire one small section at a time. I let it sit again for around a minute, then wiped off the excess with the lint-free rag. Making sure to wipe in the same direction of the grain. When you whitewash using a chalk-based paint, it tends to dry very quickly. So, you will want to work in small sections to ensure the paint doesn’t dry before you can wipe it off. (If this happens, mist the area where the paint has dried with water and then wipe. Don’t try to wipe the paint once it has dried without adding water first, as it will mess up the finish.

Step Six: Let Dry and Repeat If Needed
Once you have finished applying the whitewash to the entire piece, let it dry completely. If you would like more coverage, then you can repeat step 5 again until you’ve reached the opacity you like. I only used one coat for this piece.


This bohemian inspired armoire turned out beautifully. I am so in love with this look and the details of this armoire were an added bonus. Such a beautiful piece to add to our home. I couldn’t be happier, and I hope that you will be just as satisfied with your whitewashed piece. If you have any questions, let me know in the comment section, and I will do my best to help you.
With Love- Lindsey
About The Author
Lindsey McKale
Lindsey grew up in a small town in North Central Arkansas. In her early adulthood, she moved to Missouri where she resides today with her family. She is a mother to 6 wonderful and crazy children and wife to Bobby. She has a great love for design, DIY, family, Jesus, and coffee. She started redesigning and refinishing furniture in 2017 and started the Beauty from Ashes Furniture & Home blog the beginning 2022. She hopes to inspire others to find their creative side and to see the beauty in everything.